
 As I said in my original post on TuneConsole, ordering a PCB for this project was something of an adventure. I’m by no means experienced in this sort of thing; I usually use ExpressPCB, which has its own way of doing things. Going to Gerber was something I was a little leery of.
Using dedicated software from your chosen board house gives you a feeling of safety that a package like EAGLE tends to lack.
I mean, c’mon, how much more annoying could Cadsoft possibly make the CAM processor dialog? I’m building up a pretty serious rant when it comes to that program. Are we all really desperate enough to use EAGLE just ’cause it’s free?
Oh wait, we are!
But I digress. This post is supposed to be about Advanced Circuits…
The Design
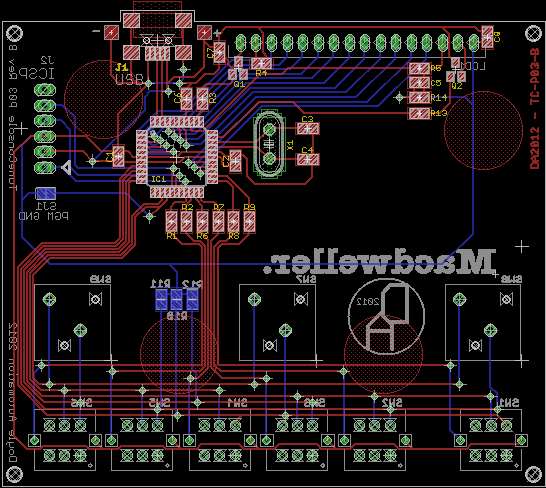
The layout for TuneConsole is, all told, relatively simple. While I really wanted to do a 4-layer board, I couldn’t justify the expense; there was no technical reason for going that route. Instead I ended up with a double-sided design with components and silkscreen on both sides of the board, and 134 drill hits in 9 different sizes.
Almost any tutorial you find on DFM (Design For Manufacturing) will tell you that you shouldn’t test the board house’s limits when it comes to resolution, but I chose to ignore that. The typical recommendation is 10mil trace/space; I went down to 8mil on this board just to see what would happen. This is a bit tighter than the space between the pads of a .8mm-pitch QFP, and should give a good idea of their performance with hobby-grade stuff.
There shouldn’t be much need to go smaller than that; too much trouble, really.
EAGLE’s CAM interface is simple enough once you know where everything is, but a pain in the neck until then. I didn’t want to go through the pain of figuring out all the annoying little details, so I did what any good hardware hacker would: I pilfered someone else’s Advanced Circuits DRU and CAM files. And so, armed with my spanking new Gerber and Excellon drill files, I was ready to find out just how hard this was going to be…
Checking For Errors
In addition to their fabrication facilities, Advanced Circuits operates a service called FreeDFM. When you’re ready to submit your design for fabrication, you can zip up your files and upload them to this service first, and it’ll check for common mistakes. It’s very handy, and can save you some time (and possibly a few botched boards).
In my case, the only things wrong were some font sizing issues (I tried to use small fonts on the silk layer, and the stroke width ended up being below what they can reliably support) and a few areas where the silkscreen crossed pads. I was fairly surprised at the latter; I thought I’d taken care of those. Problem averted, score one for FreeDFM!
No actual technical issues were present, so that was a win. The service also provided a manufacturing quote, which I ignored as I was going to use one of their promotional deals. They apparently offer a discount on their production service if you use FreeDFM though, so it’s something to keep in mind.
As an interesting side note, it can also show you the layer plot it made from your files, which made me feel a bit better about the whole thing; at least I knew that what I wanted EAGLE to output was what it actually did output. I checked it in a gerber viewer after generating it, but I like knowing that what I see is really what the manufacturer will see…
The Deal
While they aren’t the cheapest people around by any means, they do offer a fairly nice “$33 Each” special. What this essentially boils down to is $33/board for four boards, plus you get an additional board for free. There’s also an equivalent deal for $66/board for four-layer if memory serves.
The downside? Limited specifications. Check their website for details, but you essentially get what you get. The bummer for me was that I originally wanted white solder mask, but I wasn’t about to pay an extra hundred bucks or so for a more advanced service just to get it. The deal does include silkscreen on both sides, though, so that was a bonus.
The only thing that could have been a real problem was the finish: lead-free HASL. This concerned me; I haven’t done any lead-free soldering, and I’m far from an expert on that topic (as you shall soon see), so I had no idea how it would work out. I use typical 63/37 tin-lead rosin-core solder. Would it be a problem?
Well, I decided, why not ask the experts?
Pingback: An iTunes rating box for everyone - Hack a Day